Wondering what is the symbol for DC on multimeter? This isn’t uncommon; many people struggle with recognizing and properly using this symbol.
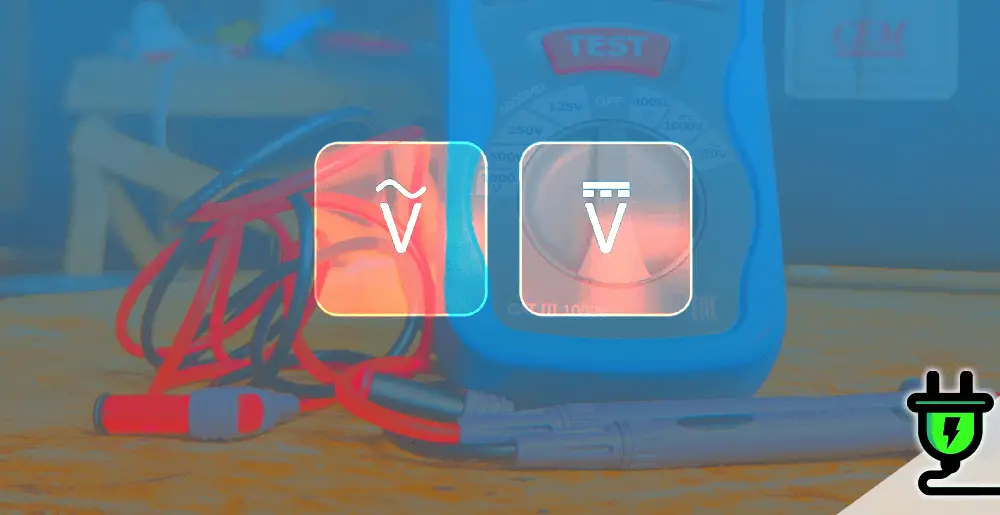
The symbol for DC voltage on a multimeter is represented by a “V” with a combination of a solid and dashed line above it. On the other hand, the AC voltage symbol is denoted by a “V” with a sine wave (“∿”) above it.
However, knowing what each distinctive marking represents is critical for safe and effective use of this versatile tool. In this blog post, we will demystify these symbols, focusing specifically on deciphering and understanding the symbol for DC (Direct Current).
So stick with us – before you know it, you’ll be navigating the DC on your multimeter like a pro!
Decoding the Symbol for DC on a Multimeter
The symbol for DC voltage on a multimeter is a dotted line with a solid line above it placed over the letter V. It represents direct current, which is when electric charge flows in a single direction.
The symbol is typically shown as a capital V with three hyphens and a straight line on top. This distinguishes it from the symbol for AC voltage, which is usually depicted as a wavy line above the letter V.
Understanding what is the symbol for DC on multimeter is important because they help us accurately measure electrical quantities such as voltage, current, and resistance using our multimeters.
When using the DC mode on a multimet er, it’s crucial to set the dial to the correct range for accurate readings and prevent any damage to the device itself. Some multimeters have multiple ranges for DC voltage so that you can select the most appropriate one for your specific measurement needs.
Remembering how to connect the black probe to COM jack and red probe to VΩmA jack, along with selecting the correct range on your multimeter dial will ensure proper measurement of DC voltage in any circuit or electronics project you’re working on.
Tips for Using DC Mode on a Multimeter
Connect the black probe to the COM jack and the red probe to the VΩmA jack. Set the dial to the DC voltage symbol, then take your measurement.
Connect the black probe to the COM jack
To measure DC voltage with a multimeter, start by connecting the black probe to the COM jack. This is an important step as it ensures that the ground reference is established for accurate readings.
The COM jack is usually labeled on the multimeter for easy identification. By making this connection, you are ready to proceed with your DC voltage measurement.
Connect the red probe to the VΩmA jack
To measure DC voltage on a multimeter, connect the red probe to the VΩmA jack. This allows for accurate measurement of direct current electrical signals. The VΩmA jack is specifically designed for voltage and resistance measurements, making it the appropriate connection point for measuring DC voltage.
By connecting the red probe to this jack, you ensure that your multimeter is set up correctly to accurately measure DC voltage in a circuit or electronic device.
Set the dial to the DC voltage symbol
To measure DC voltage on a multimeter, simply set the dial to the symbol for DC voltage. This symbol is represented by a dotted line with a solid line above itplaced over the letter V.
It’s important to choose the appropriate DC voltage range on the multimeter before taking measurements to ensure accurate results and protect the device from damage. Remember that the DC voltage symbol is just one of many symbols found on a multimeter, each representing a specific function or measurement.
By understanding these symbols, you can effectively use your multimeter for electrical measurement and troubleshooting.
Take the measurement
To take a measurement using the DC voltage mode on a multimeter, follow these steps. First, connect the black probe to the COM jack on the multimeter. Then, connect the red probe to the VΩmA jack.
Next, set the dial or selector switch to the symbol for DC voltage. This is represented by a dotted line with a solid line above it placed over the letter V. Once everything is connected and set up correctly, you can now take your measurement by placing the probes across the circuit or component you want to measure.
The multimeter will display the DC voltage reading on its screen.
It’s important to use caution when taking measurements in DC mode as selecting an incorrect range might result in inaccurate readings or damage to your multimeter. Make sure you choose an appropriate range for your specific measurement and double-check your connections before proceeding.
What is the symbol for dc on multimeter FAQs
How do I switch my multimeter to measure DC voltage?
To measure DC voltage, turn your multimeter dial to the “V” or “DCV” setting.
Can I use my multimeter to measure AC and DC currents?
Yes, many multimeters have an option to measure both AC (alternating current) and DC currents. Refer to your multimeter’s instruction manual for specific instructions.
Is it important to select the correct setting when measuring AC or DC with a multimeter?
Yes, selecting the correct setting when measuring AC or DC is crucial for accurate readings. Using the wrong setting may give incorrect results or damage your meter.
Conclusion: What is the symbol for dc on multimeter?
Now that you know what the symbol for DC voltage on a multimeter looks like, you can confidently measure direct current in your circuits. Remember to select the appropriate range and follow proper connection methods for accurate readings.
Understanding the DC symbol will help you make precise measurements and troubleshoot electrical issues effectively.
Brian
Brian has spent over 30 years as a general contractor, and in that time seen and faced many challenges. He brings all his knowledge of portable generators, battery powered tools, and outdoor equipment to every post he writes through real life experience. Learn more about us.
We use cookies on our website to give you the most relevant experience by remembering your preferences and repeat visits. By clicking “Accept”, you consent to the use of ALL the cookies.
This website uses cookies to improve your experience while you navigate through the website. Out of these, the cookies that are categorized as necessary are stored on your browser as they are essential for the working of basic functionalities of the website. We also use third-party cookies that help us analyze and understand how you use this website. These cookies will be stored in your browser only with your consent. You also have the option to opt-out of these cookies. But opting out of some of these cookies may affect your browsing experience.
Necessary cookies are absolutely essential for the website to function properly. These cookies ensure basic functionalities and security features of the website, anonymously.
Cookie
Duration
Description
cookielawinfo-checkbox-analytics
11 months
This cookie is set by GDPR Cookie Consent plugin. The cookie is used to store the user consent for the cookies in the category "Analytics".
cookielawinfo-checkbox-functional
11 months
The cookie is set by GDPR cookie consent to record the user consent for the cookies in the category "Functional".
cookielawinfo-checkbox-necessary
11 months
This cookie is set by GDPR Cookie Consent plugin. The cookies is used to store the user consent for the cookies in the category "Necessary".
cookielawinfo-checkbox-others
11 months
This cookie is set by GDPR Cookie Consent plugin. The cookie is used to store the user consent for the cookies in the category "Other.
cookielawinfo-checkbox-performance
11 months
This cookie is set by GDPR Cookie Consent plugin. The cookie is used to store the user consent for the cookies in the category "Performance".
viewed_cookie_policy
11 months
The cookie is set by the GDPR Cookie Consent plugin and is used to store whether or not user has consented to the use of cookies. It does not store any personal data.
Functional cookies help to perform certain functionalities like sharing the content of the website on social media platforms, collect feedbacks, and other third-party features.
Performance cookies are used to understand and analyze the key performance indexes of the website which helps in delivering a better user experience for the visitors.
Analytical cookies are used to understand how visitors interact with the website. These cookies help provide information on metrics the number of visitors, bounce rate, traffic source, etc.
Advertisement cookies are used to provide visitors with relevant ads and marketing campaigns. These cookies track visitors across websites and collect information to provide customized ads.